디자인 패턴이란?
소프트웨어 개발 방법에서 사용되는 디자인 패턴은 프로그램 개발에서 자주 나타나는 과제를 해결하기 위한 방법 중 하나로, 과거의 소프트웨어 개발 과정에서 발견된 설계의 노하우를 축적하여 이름을 붙여, 이후에 재이용하기 좋은 형태로 특정의 규약을 묶어서 정리한 것이다.
서비스 로케이터 패턴
서비스 로케이터 패턴은 서비스들을 로케이터에 등록하여 관리하며, 요청하는 쪽에서 필요한 서비스들을 찾아서 건내주는 역할을 한다.
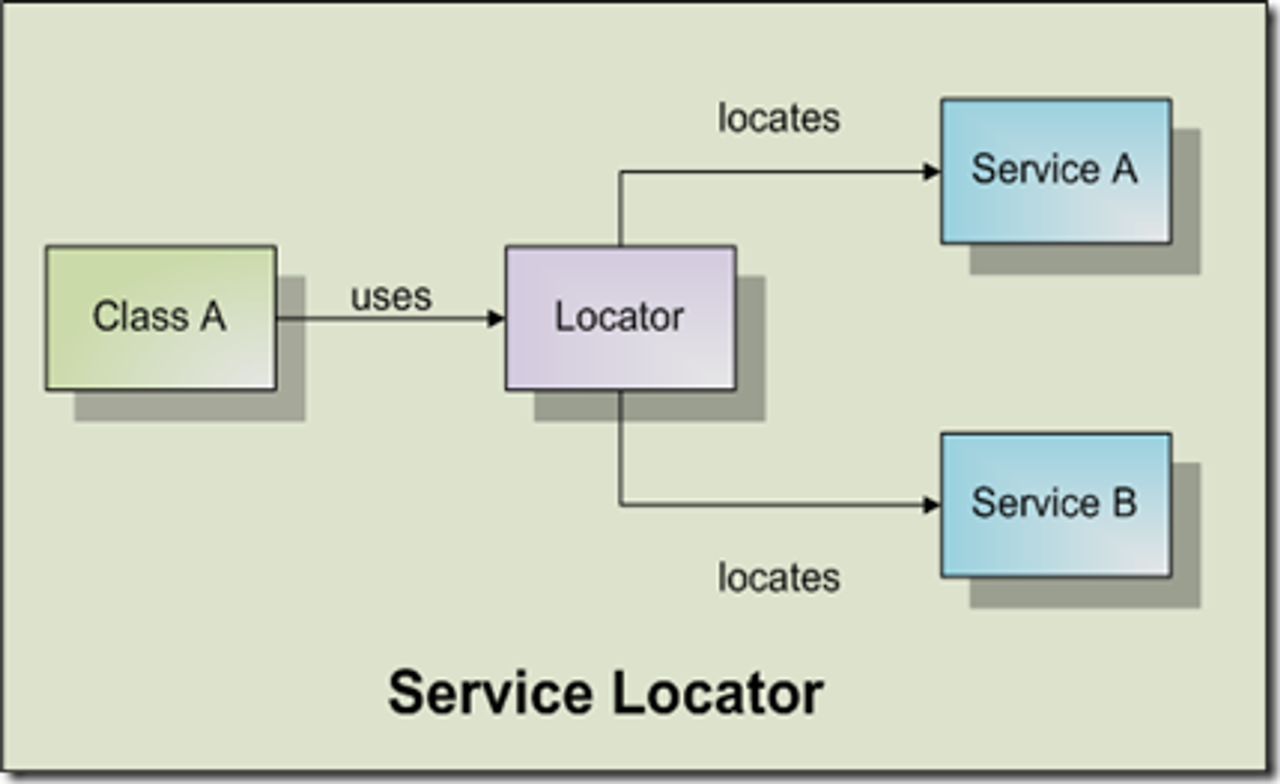
서비스 로케이터 패턴(Service Locator Pattern)은 런타임에 필요한 서비스 객체를 클라이언트에게 제공하는 디자인 패턴이다.
이 패턴은 애플리케이션에서 서비스 객체를 검색하고 반환하는 데 사용된다.(대표적으로 싱글톤 오브젝트 찾는 데 활용).
이를 통해 클라이언트 코드가 구체적인 서비스 클래스에 의존하지 않고 간단히 서비스를 사용할 수 있게 된다.
예시 1 - 기본 서비스 찾기▼
`ServiceLocator`에 서비스들을 등록하고, 이를 딕셔너리 형태로 찾을 수 있도록 하는 것 서비스가 추가됨에 따라 `Service Locator`는 하나도 바뀔 필요가 없음
using System;
using System.Collections.Generic;
using UnityEngine;

public static class ServiceLocator
{
    private static Dictionary<Type, object> services = new Dictionary<Type, object>();

    public static void RegisterService<T>(T service) where T : class
    {
        var type = typeof(T);
        if (!services.ContainsKey(type))
        {
            services.Add(type, service);
        }
    }

    public static T GetService<T>() where T : class
    {
        var type = typeof(T);
        if (services.ContainsKey(type))
        {
            return (T)services[type];
        }
        throw new Exception("Service not found: " + type);
    }
}

public class AudioService
{
    public void PlaySound(string soundName)
    {
        Debug.Log("Playing sound: " + soundName);
    }
}

public class LoggingService
{
    public void LogMessage(string message)
    {
        Debug.Log("Log: " + message);
    }
}

public class AudioManager : MonoBehaviour
{
    private AudioService audioService;

    void Start()
    {
        audioService = ServiceLocator.GetService<AudioService>();
        audioService.PlaySound("BackgroundMusic");
    }
}

public class LoggingManager : MonoBehaviour
{
    private LoggingService loggingService;

    void Start()
    {
        loggingService = ServiceLocator.GetService<LoggingService>();
        loggingService.LogMessage("Game started");
    }
}

public class GameInitializer : MonoBehaviour
{
    void Awake()
    {
        AudioService audioService = new AudioService();
        LoggingService loggingService = new LoggingService();

        ServiceLocator.RegisterService(audioService);
        ServiceLocator.RegisterService(loggingService);
    }
}
예시 2 - 싱글톤 찾기 ▼
using System;
using System.Collections.Generic;
using UnityEngine;

public static class ServiceLocator
{
    private static Dictionary<Type, object> services = new Dictionary<Type, object>();

    public static void RegisterService<T>(T service) where T : class
    {
        var type = typeof(T);
        if (!services.ContainsKey(type))
        {
            services.Add(type, service);
        }
    }

    public static T GetService<T>() where T : class
    {
        var type = typeof(T);
        if (services.ContainsKey(type))
        {
            return (T)services[type];
        }
        throw new Exception("Service not found: " + type);
    }
}

public class AudioManager : MonoBehaviour
{
    public void PlaySound()
    {
		    Debug.Log("DingDing");
    }
}

public class LoggingManager : MonoBehaviour
{
    public void LogSomething(){
		    Debug.Log("Critical Issue Happened");
    }
}

public class GameInitializer : MonoBehaviour
{
    void Awake()
    {
        AudioManager audioManager = gameObject.AddComponent<AudioManager>();
        LoggingManager loggingManager = gameObject.AddComponent<LoggingManager>();

        ServiceLocator.RegisterService(audioManager);
        ServiceLocator.RegisterService(loggingManager);

        ServiceLocator.GetService<AudioManager>().PlaySound();
    }
}
특징
- 클래스의 코드와 서비스 클래스 사이의 결합도 줄어듦
- 싱글톤 러버가 쓰면 그 사랑이 더 심해질 수 있음 (싱글톤의 싱글톤)
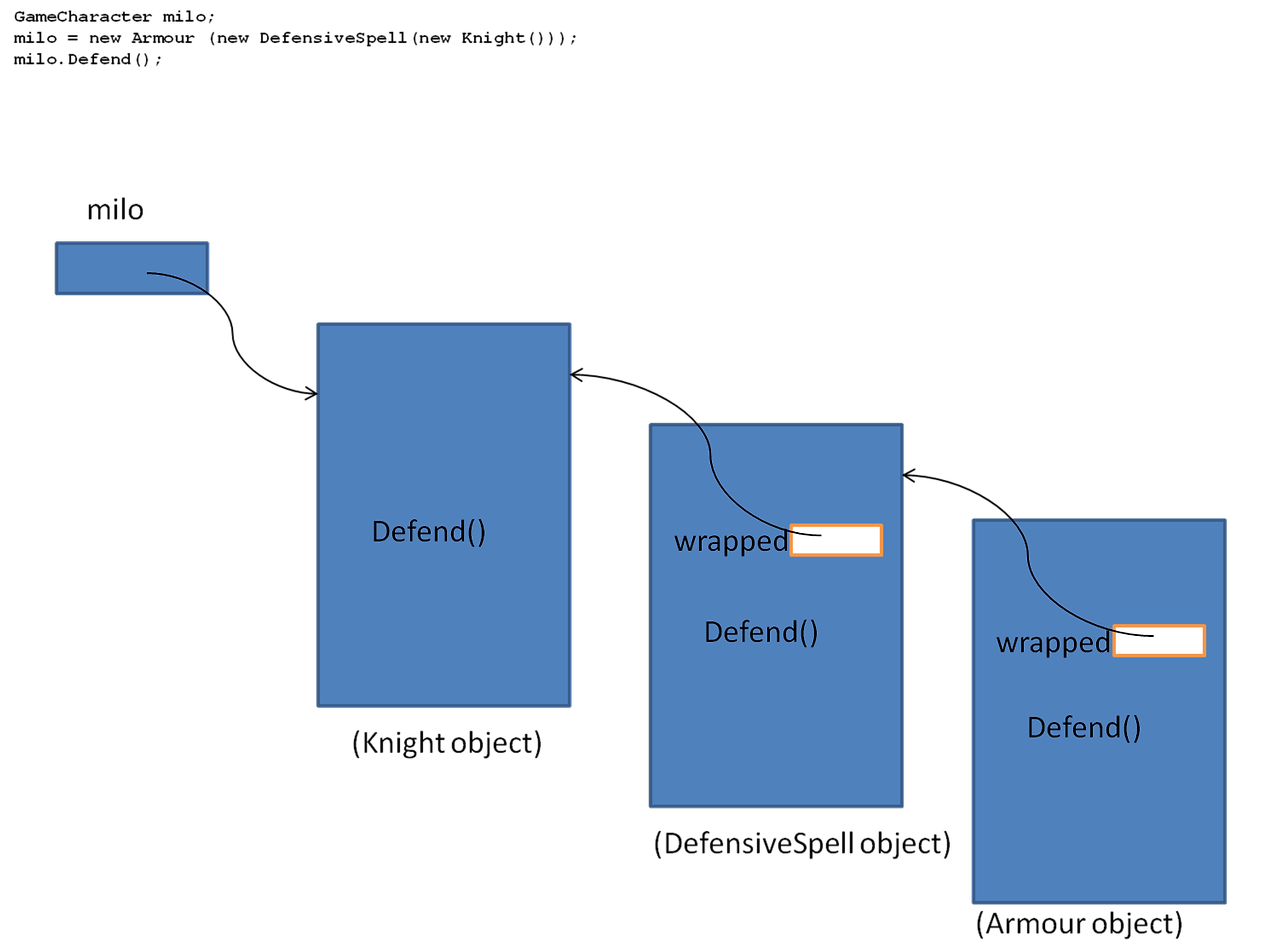
데코레이터 패턴
주어진 상황 및 용도에 따라 어떤 객체에 책임을 덧붙이는 패턴으로, 기능 확장이 필요할 때 서브클래싱 대신 쓸 수 있는 유연한 대안이 될 수 있다.
주로 객체의 기능을 확장할 때 기존 코드를 변경하지 않고도 새로운 행동을 추가할 수 있다는 장점이 있다.
데코레이터 패턴의 주요 구성 요소는 다음과 같다:
- 컴포넌트(Component): 기본 인터페이스 또는 추상 클래스이다. 이 컴포넌트는 구체적인 컴포넌트와 데코레이터들이 구현해야 하는 공통 인터페이스를 정의한다.
- 구체적인 컴포넌트(Concrete Component): 기본 컴포넌트의 구체적인 구현체이다. 기본 기능을 실제로 수행하는 클래스이다.
- 데코레이터(Decorator): 컴포넌트 인터페이스를 구현하거나 상속받는 추상 클래스이다. 이 클래스는 컴포넌트 객체를 포함하고 있으며, 컴포넌트 객체에 추가적인 행동을 "감싸서" 제공한다.
- 구체적인 데코레이터(Concrete Decorator): 데코레이터 클래스의 구체적인 구현체로, 추가할 기능을 실제로 구현한다. 구체적인 데코레이터는 컴포넌트 객체에 새로운 행동을 동적으로 추가한다.
예시 1 - 간단한 패턴 ▼
public interface IComponent
{
    void Draw();
}

public class TextBox : IComponent
{
    public void Draw()
    {
        Debug.Log("Drawing TextBox");
    }
}

public abstract class ComponentDecorator : IComponent
{
    protected IComponent _decoratedComponent;

    public ComponentDecorator(IComponent decoratedComponent)
    {
        _decoratedComponent = decoratedComponent;
    }

    public virtual void Draw()
    {
        _decoratedComponent.Draw();
    }
}

public class BorderDecorator : ComponentDecorator
{
    public BorderDecorator(IComponent decoratedComponent) : base(decoratedComponent) { }

    public override void Draw()
    {
        base.Draw();
        DrawBorder();
    }

    private void DrawBorder()
    {
        Debug.Log("Drawing Border");
    }
}

public class ScrollDecorator : ComponentDecorator
{
    public ScrollDecorator(IComponent decoratedComponent) : base(decoratedComponent) { }

    public override void Draw()
    {
        base.Draw();
        DrawScrollBar();
    }

    private void DrawScrollBar()
    {
        Debug.Log("Drawing ScrollBar");
    }
}

public class Window : MonoBehaviour
{
    void Start()
    {
        IComponent textBox = new TextBox();
        IComponent borderedTextBox = new BorderDecorator(textBox);
        IComponent scrollableBorderedTextBox = new ScrollDecorator(borderedTextBox);

        textBox.Draw();                     // 출력: Drawing TextBox
        borderedTextBox.Draw();             // 출력: Drawing TextBox, Drawing Border
        scrollableBorderedTextBox.Draw();   // 출력: Drawing TextBox, Drawing Border, Drawing ScrollBar
    }
}
예시 2 - 비트플래그 ✖️ 데코레이터 패턴 ▼
다양한 능력을 가질 수 있는 캐릭터를 빌드한다고 생각해보자.
데코레이터 패턴을 통해 필요한 기능들을 래핑할 수 있다.
using System;

[System.Flags]
public enum Abilities
{
    None = 0,
    Fly = 1 << 0,
    Invisibility = 1 << 1,
    SuperStrength = 1 << 2
}

public interface ICharacter
{
    void PerformAbility();
}

public class BasicCharacter : ICharacter
{
    public void PerformAbility()
    {
        Debug.Log("Performing basic ability");
    }
}
public abstract class CharacterDecorator : ICharacter
{
    protected ICharacter _decoratedCharacter;

    public CharacterDecorator(ICharacter decoratedCharacter)
    {
        _decoratedCharacter = decoratedCharacter;
    }

    public virtual void PerformAbility()
    {
        _decoratedCharacter.PerformAbility();
    }
}

public class FlyDecorator : CharacterDecorator
{
    public FlyDecorator(ICharacter decoratedCharacter) : base(decoratedCharacter) { }

    public override void PerformAbility()
    {
        base.PerformAbility();
        Fly();
    }

    private void Fly()
    {
        Debug.Log("Flying");
    }
}

public class InvisibilityDecorator : CharacterDecorator
{
    public InvisibilityDecorator(ICharacter decoratedCharacter) : base(decoratedCharacter) { }

    public override void PerformAbility()
    {
        base.PerformAbility();
        BecomeInvisible();
    }

    private void BecomeInvisible()
    {
        Debug.Log("Becoming invisible");
    }
}

public class SuperStrengthDecorator : CharacterDecorator
{
    public SuperStrengthDecorator(ICharacter decoratedCharacter) : base(decoratedCharacter) { }

    public override void PerformAbility()
    {
        base.PerformAbility();
        UseSuperStrength();
    }

    private void UseSuperStrength()
    {
        Debug.Log("Using super strength");
    }
}

public class Game : MonoBeahaviour
{
    void Start()
    {
        Abilities playerAbilities = Abilities.Fly | Abilities.SuperStrength;

        ICharacter character = new BasicCharacter();

        if (playerAbilities.HasFlag(Abilities.Fly))
        {
            character = new FlyDecorator(character);
        }

        if (playerAbilities.HasFlag(Abilities.Invisibility))
        {
            character = new InvisibilityDecorator(character);
        }

        if (playerAbilities.HasFlag(Abilities.SuperStrength))
        {
            character = new SuperStrengthDecorator(character);
        }

        character.PerformAbility();
        // Performing basic ability, Flying, Using super strength
    }
}
예시 2 개선 - 능력 뗐다 붙였다 ▼
using System;
using System.Collections.Generic;
using UnityEngine;

public class Game : MonoBehaviour
{
    private Abilities playerAbilities = Abilities.None;
    private ICharacter character;
    private HashSet<Type> appliedDecorators = new HashSet<Type>();

    void Start()
    {
        character = new BasicCharacter();
        AddAbility(Abilities.Fly);
        AddAbility(Abilities.SuperStrength);
        character.PerformAbility(); // 출력: Performing basic ability, Flying, Using super strength
    }

    public void AddAbility(Abilities ability)
    {
        playerAbilities |= ability;

        if (ability.HasFlag(Abilities.Fly) && !appliedDecorators.Contains(typeof(FlyDecorator)))
        {
            character = new FlyDecorator(character);
            appliedDecorators.Add(typeof(FlyDecorator));
        }

        if (ability.HasFlag(Abilities.Invisibility) && !appliedDecorators.Contains(typeof(InvisibilityDecorator)))
        {
            character = new InvisibilityDecorator(character);
            appliedDecorators.Add(typeof(InvisibilityDecorator));
        }

        if (ability.HasFlag(Abilities.SuperStrength) && !appliedDecorators.Contains(typeof(SuperStrengthDecorator)))
        {
            character = new SuperStrengthDecorator(character);
            appliedDecorators.Add(typeof(SuperStrengthDecorator));
        }
    }

    public void RemoveAbility(Abilities ability)
    {
        playerAbilities &= ~ability;
        RebuildCharacter();
    }

    private void RebuildCharacter()
    {
        character = new BasicCharacter();
        appliedDecorators.Clear();

        if (playerAbilities.HasFlag(Abilities.Fly))
        {
            character = new FlyDecorator(character);
            appliedDecorators.Add(typeof(FlyDecorator));
        }

        if (playerAbilities.HasFlag(Abilities.Invisibility))
        {
            character = new InvisibilityDecorator(character);
            appliedDecorators.Add(typeof(InvisibilityDecorator));
        }

        if (playerAbilities.HasFlag(Abilities.SuperStrength))
        {
            character = new SuperStrengthDecorator(character);
            appliedDecorators.Add(typeof(SuperStrengthDecorator));
        }
    }

    void Update()
    {
        if (Input.GetKeyDown(KeyCode.A))
        {
            AddAbility(Abilities.Invisibility);
            character.PerformAbility(); // 현재 능력들 출력
        }
        else if (Input.GetKeyDown(KeyCode.R))
        {
            RemoveAbility(Abilities.Fly);
            character.PerformAbility(); // 현재 능력들 출력
        }
    }
}
특징
- 서브 클래스를 과도하게 만들 각인 경우 매우 유용
- 과도하게 사용 시 욕먹기 딱 좋음
- 같이 일하는 사람이 못 알아 듣는 코드를 작성한 당신 잘못
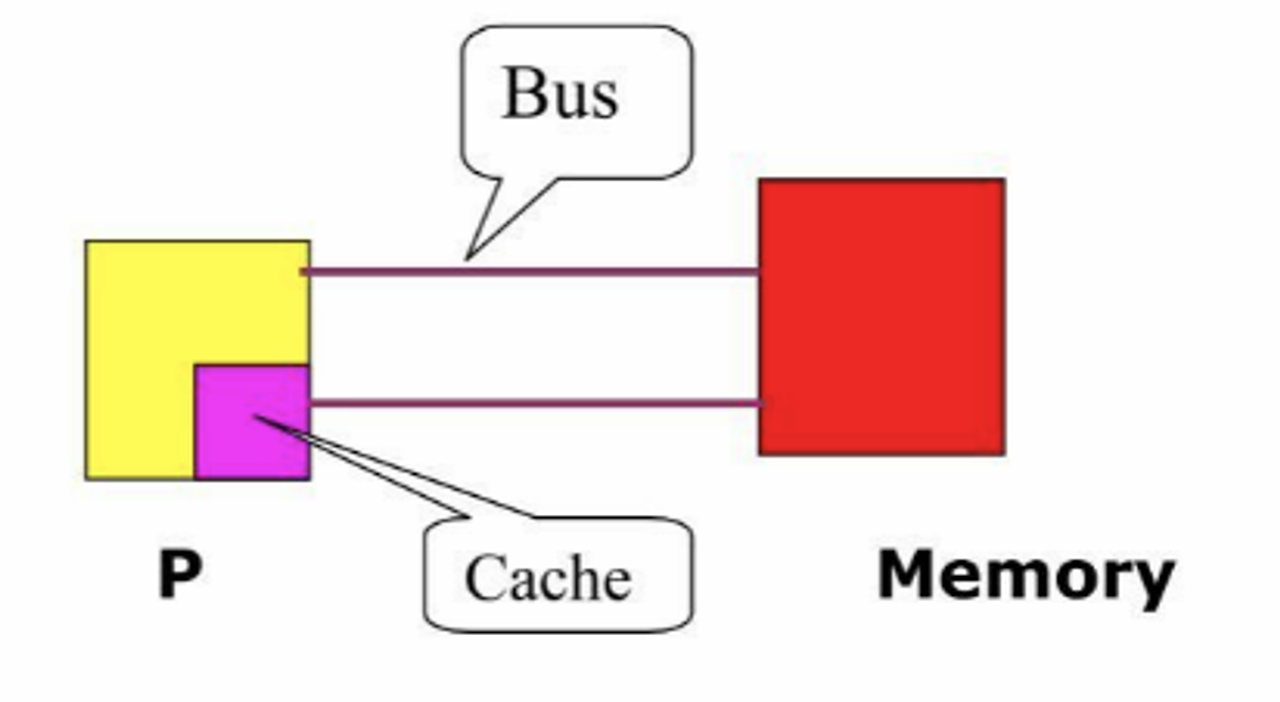
- 캐시 히트율을 극적으로 떨어뜨림
- 사실 객체지향 프로그래밍의 큰 특징 중 하나지만 너무 심하게 떨어뜨림
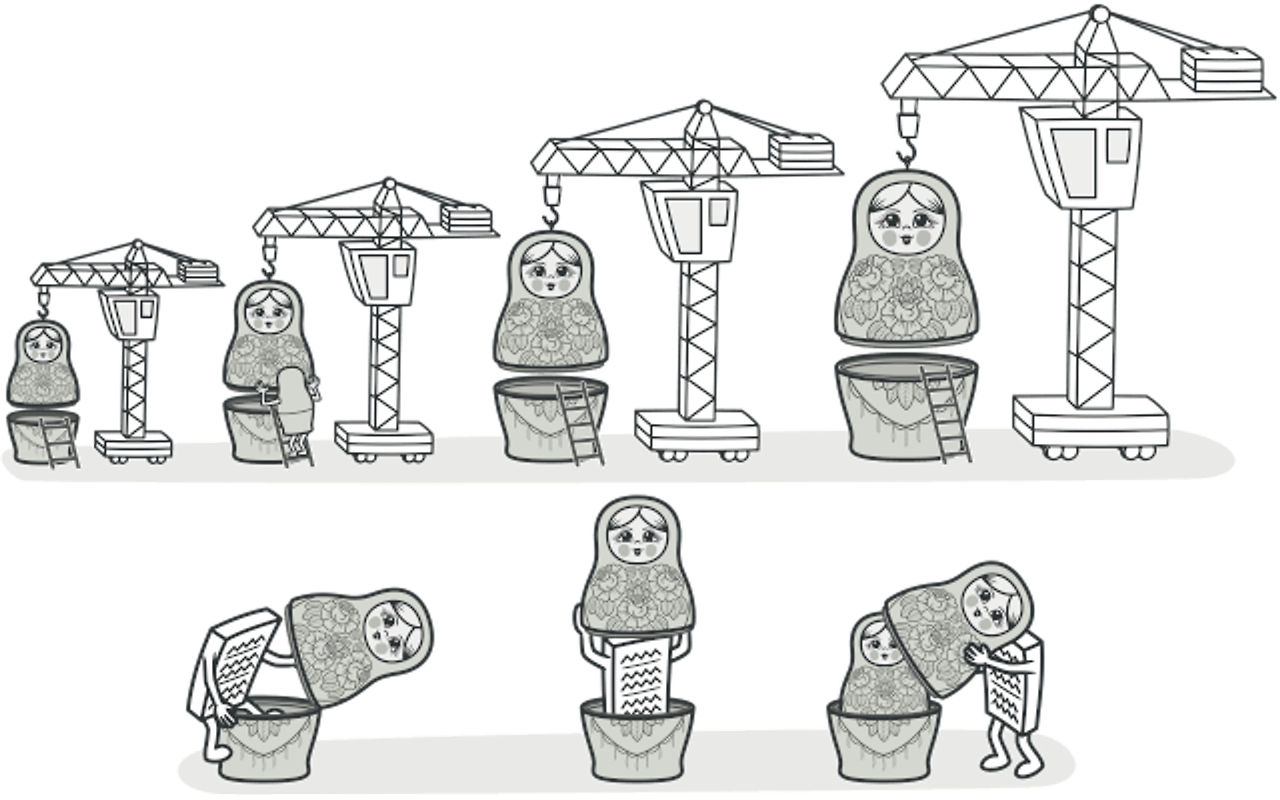
빌더 패턴

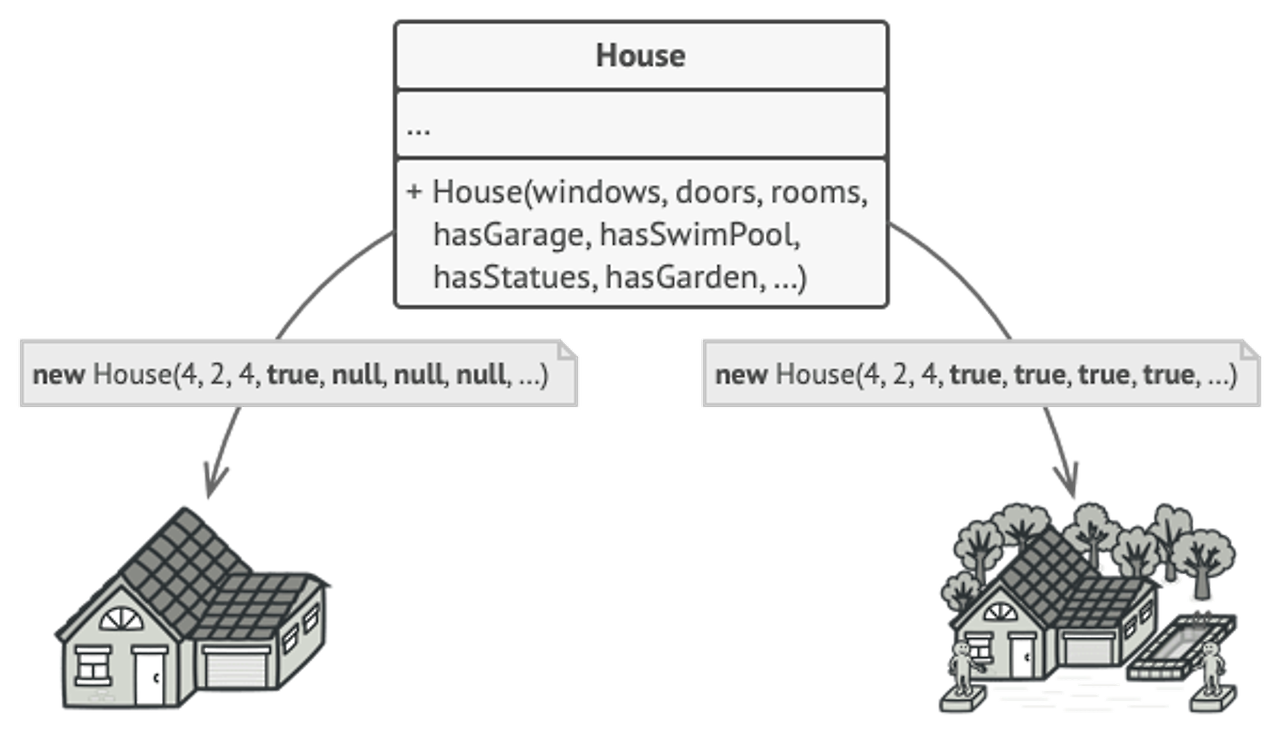
로봇이나 집과 같은 복잡한 객체를 생성하는 것은 매우 어렵고 신경 써야 할 것이 많다. 객체 생성을 어떻게 하면 체계적으로 잘 개선해볼까? 라는 생각에서 빌더 패턴이 시작되었다고 생각하면 좋다.
빌더 패턴(Builder Pattern)은 객체의 생성 과정과 표현 방법을 분리하여 동일한 생성 절차에서 서로 다른 표현 결과를 만들 수 있게 하는 생성 디자인 패턴이다. 이는 복잡한 객체를 단계별로 생성할 수 있게 해주며, 각 단계는 독립적으로 다룰 수 있다. 주로 객체 생성에 많은 단계가 필요하거나 다양한 표현이 필요한 경우에 유용하다.
빌더 패턴의 주요 구성 요소는 다음과 같다:
- 제품(Product): 생성될 복잡한 객체이다.
- 빌더(Builder): 제품을 생성하는데 필요한 인터페이스를 정의한다.
- 구체적인 빌더(Concrete Builder): 빌더 인터페이스를 구현하여 제품의 구체적인 부분을 생성한다.
- 감독자(Director): 빌더 객체를 이용해 제품을 생성하는 데 필요한 순서를 정의한다.
예시 - 착한 사람들이 사는 마을의 공장 ▼
위의 로봇에서의 사례처럼, 위에서부터 컨베이어벨트를 타고 내려오는 Character의 생성 과정을 살펴보자.
public class Character
{
    public string Name { get; set; }
    public int Health { get; set; }
    public int Strength { get; set; }
    public int Agility { get; set; }

    public void DisplayCharacterInfo()
    {
        Debug.Log($"Name: {Name}, Health: {Health}, Strength: {Strength}, Agility: {Agility}");
    }
}

public class CharacterBuilder
{
    private Character character;

		// 생성자부터 컨베이어벨트에 탄다고 생각하면 편함
    public CharacterBuilder()
    {
        character = new Character();
    }

    public CharacterBuilder SetName(string name)
    {
        character.Name = name;
        return this;
    }

    public CharacterBuilder SetHealth(int health)
    {
        character.Health = health;
        return this;
    }

    public CharacterBuilder SetStrength(int strength)
    {
        character.Strength = strength;
        return this;
    }

    public CharacterBuilder SetAgility(int agility)
    {
        character.Agility = agility;
        return this;
    }

    public Character Build()
    {
        return character;
    }
}

using UnityEngine;

public class Game : MonoBehaviour
{
    void Start()
    {
        CharacterBuilder builder = new CharacterBuilder();

        Character hero = builder.SetName("Hero")
                                .SetHealth(100)
                                .SetStrength(50)
                                .SetAgility(30)
                                .Build();

        Character villain = builder.SetName("Villain")
                                   .SetHealth(120)
                                   .SetStrength(70)
                                   .SetAgility(20)
                                   .Build();

        hero.DisplayCharacterInfo();
        villain.DisplayCharacterInfo();
    }
}
예시 변형 - 의심 많은 공장장이 돌리는 공장 ▼
public class CharacterDirector
{
    private CharacterBuilder builder;

    public CharacterDirector(CharacterBuilder builder)
    {
        this.builder = builder;
    }

    public Character ConstructWarrior()
    {
        return builder.SetName("Warrior")
                      .SetHealth(200)
                      .SetStrength(150)
                      .SetAgility(50)
                      .Build();
    }

    public Character ConstructMage()
    {
        return builder.SetName("Mage")
                      .SetHealth(100)
                      .SetStrength(50)
                      .SetAgility(100)
                      .Build();
    }
}

public class Game : MonoBehaviour
{
    void Start()
    {
        CharacterBuilder builder = new CharacterBuilder();
        CharacterDirector director = new CharacterDirector(builder);

        Character warrior = director.ConstructWarrior();
        warrior.DisplayCharacterInfo();

        Character mage = director.ConstructMage();
        mage.DisplayCharacterInfo();
    }
}
팩토리 메소드 패턴
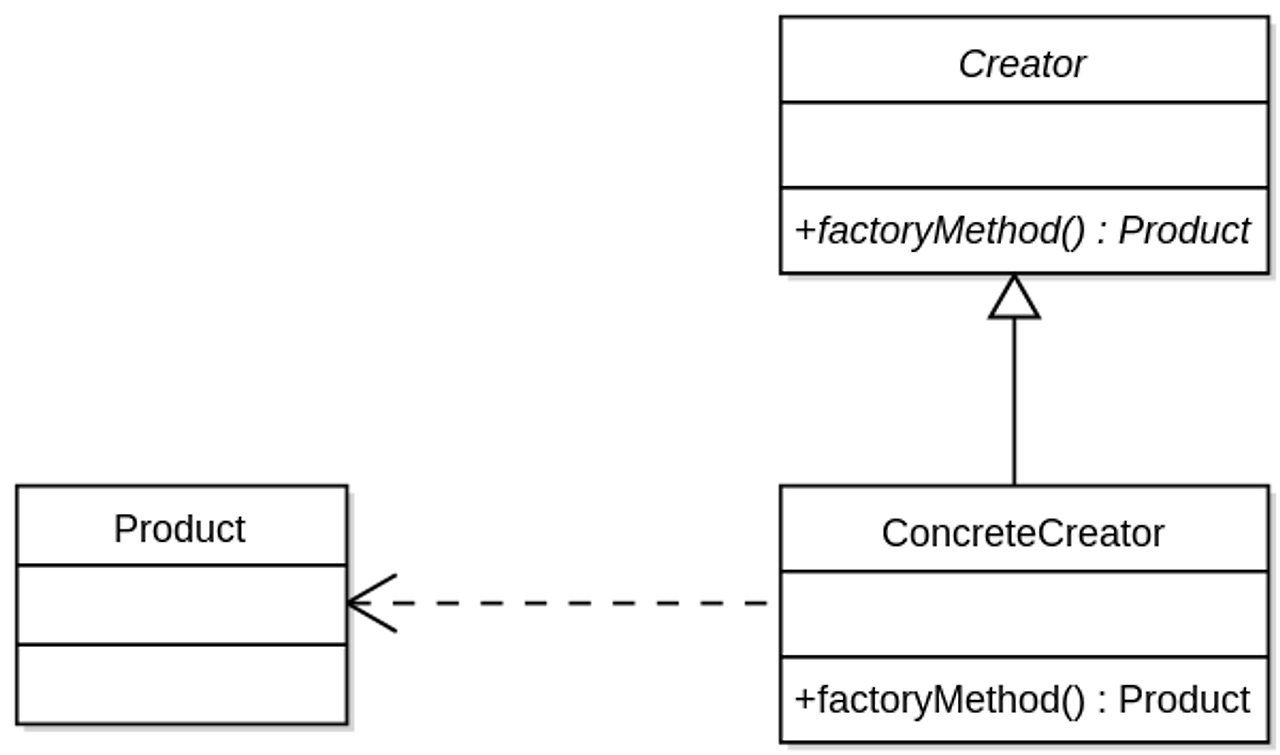
팩토리 메소드 패턴(Factory Method Pattern)은 객체 생성 로직을 클래스화하여 클라이언트 코드가 구체적인 클래스의 인스턴스를 직접 생성하지 않고 팩토리를 통해 생성하도록 하는 디자인 패턴이다.
예시 ▼
public interface IWeapon
{
    void Use();
}

public class Sword : IWeapon
{
    public void Use()
    {
        Debug.Log("Swinging a sword!");
    }
}

public class Bow : IWeapon
{
    public void Use()
    {
        Debug.Log("Shooting an arrow!");
    }
}

public abstract class WeaponFactory
{
    public abstract IWeapon CreateWeapon();
}

public class SwordFactory : WeaponFactory
{
    public override IWeapon CreateWeapon()
    {
        return new Sword();
    }
}

public class BowFactory : WeaponFactory
{
    public override IWeapon CreateWeapon()
    {
        return new Bow();
    }
}

public class Game : MonoBehaviour
{
    void Start()
    {
        WeaponFactory swordFactory = new SwordFactory();
        IWeapon sword = swordFactory.CreateWeapon();
        sword.Use();

        WeaponFactory bowFactory = new BowFactory();
        IWeapon bow = bowFactory.CreateWeapon();
        bow.Use();
    }
}
추상 팩토리 패턴
추상 팩토리 패턴을 활용하면 관련된 객체들을 생성하는 방법이 용이해진다. ‘A와 관련된 가, 나, 다 타입의 인스턴스가 필요하다’와 같은 요구사항이 반복된다면 활용할 수 있다.
예시 ▼
public interface IEnemy
{
    void Attack();
}

public class Goblin : IEnemy
{
    public void Attack()
    {
        Debug.Log("Goblin attacks!");
    }
}

public class Orc : IEnemy
{
    public void Attack()
    {
        Debug.Log("Orc attacks!");
    }
}

public interface IWeapon
{
    void Use();
}

public class Sword : IWeapon
{
    public void Use()
    {
        Debug.Log("Swinging a sword!");
    }
}

public class Axe : IWeapon
{
    public void Use()
    {
        Debug.Log("Swinging an axe!");
    }
}

public interface IAbstractFactory
{
    IEnemy CreateEnemy();
    IWeapon CreateWeapon();
}

public class GoblinFactory : IAbstractFactory
{
    public IEnemy CreateEnemy()
    {
        return new Goblin();
    }

    public IWeapon CreateWeapon()
    {
        return new Sword();
    }
}

public class OrcFactory : IAbstractFactory
{
    public IEnemy CreateEnemy()
    {
        return new Orc();
    }

    public IWeapon CreateWeapon()
    {
        return new Axe();
    }
}

public class Battle
{
    private IEnemy enemy;
    private IWeapon weapon;

    public Battle(IAbstractFactory factory)
    {
        this.enemy = factory.CreateEnemy();
        this.weapon = factory.CreateWeapon();
    }

    public void Start()
    {
        enemy.Attack();
        weapon.Use();
    }
}

public class TestScript : MonoBehaviour
{
    void Start()
    {
        // Goblin factory
        IAbstractFactory goblinFactory = new GoblinFactory();
        Battle goblinBattle = new Battle(goblinFactory);
        goblinBattle.Start();

        // Orc factory
        IAbstractFactory orcFactory = new OrcFactory();
        Battle orcBattle = new Battle(orcFactory);
        orcBattle.Start();
    }
}
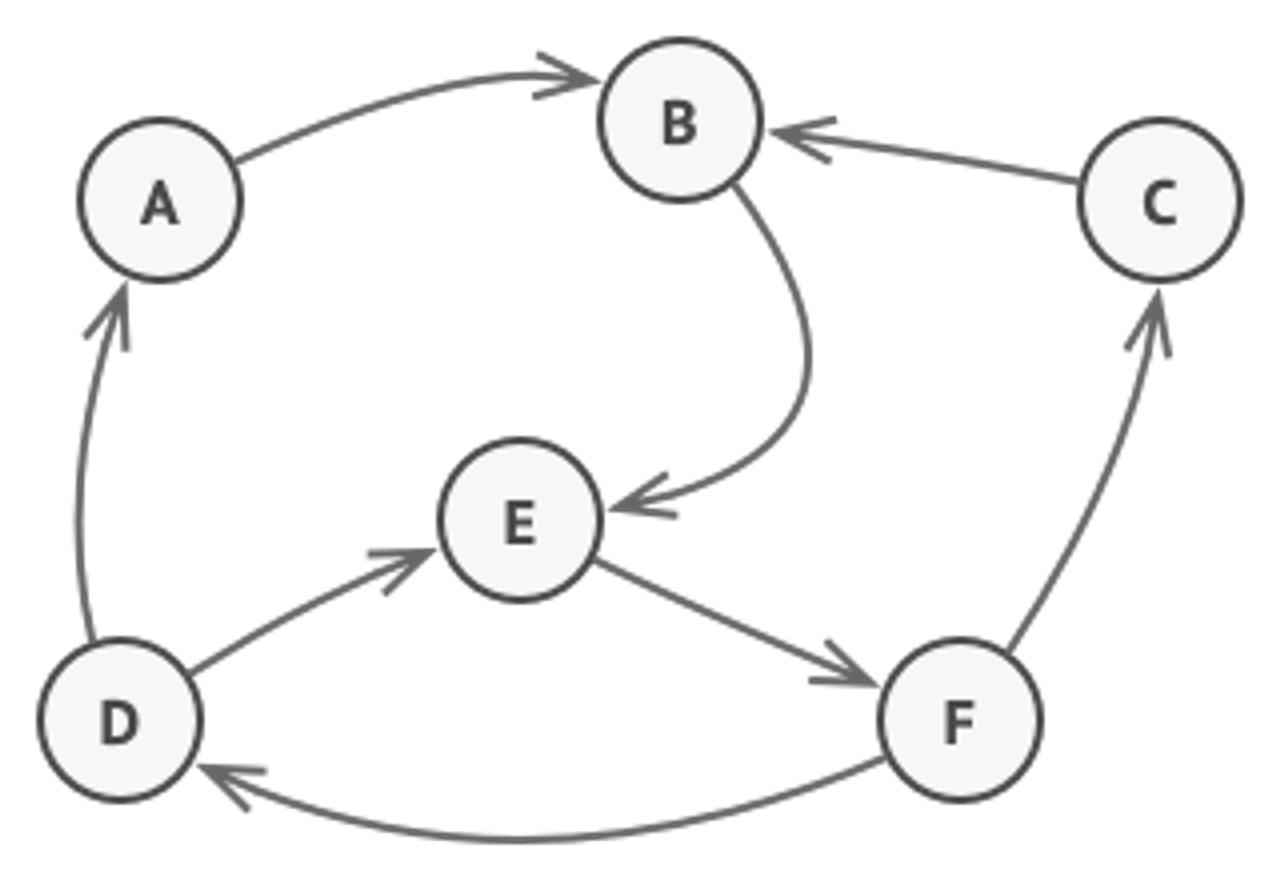
상태 패턴
상태 패턴은 어떤 객체가 처할 수 있는 다양한 상태들을 정의하고, 이 사이에서 움직이는 전이가 일어나게 하는 패턴이다. 현재 상태에 따른 행동이 달라지는 경우에 활용할 수 있다.
FSM (Finite State Machine)
간단한 N개의 상태를 두고 그 안에서 전이가 일어나는 형태의 구현에서 활용한다.
public interface IState
{
		// 기본적으로 상태들은 들어갈 때와 나올 때, 그리고 매 프레임이 중요함
		// Start, Update, OnDisable 생각하면 됨
    void Enter();
    void Execute();
    void Exit();
}

public class IdleState : IState
{
    public void Enter()
    {
        Debug.Log("Entering Idle State");
    }

    public void Execute()
    {
        Debug.Log("Executing Idle State");
    }

    public void Exit()
    {
        Debug.Log("Exiting Idle State");
    }
}

public class WalkState : IState
{
    public void Enter()
    {
        Debug.Log("Entering Walk State");
    }

    public void Execute()
    {
        Debug.Log("Executing Walk State");
    }

    public void Exit()
    {
        Debug.Log("Exiting Walk State");
    }
}

public class StateMachine
{
    private IState currentState;

    public void ChangeState(IState newState)
    {
        if (currentState != null)
        {
            currentState.Exit();
        }

        currentState = newState;
        currentState.Enter();
    }

    public void Update()
    {
        if (currentState != null)
        {
            currentState.Execute();
        }
    }
}

public class Character : MonoBehaviour
{
    private StateMachine stateMachine;

    void Start()
    {
        stateMachine = new StateMachine();
        stateMachine.ChangeState(new IdleState());
    }

    void Update()
    {
        if (Input.GetKeyDown(KeyCode.W))
        {
            stateMachine.ChangeState(new WalkState());
        }
        else if (Input.GetKeyDown(KeyCode.I))
        {
            stateMachine.ChangeState(new IdleState());
        }

        stateMachine.Update();
    }
}
H(Hierarchial) FSM
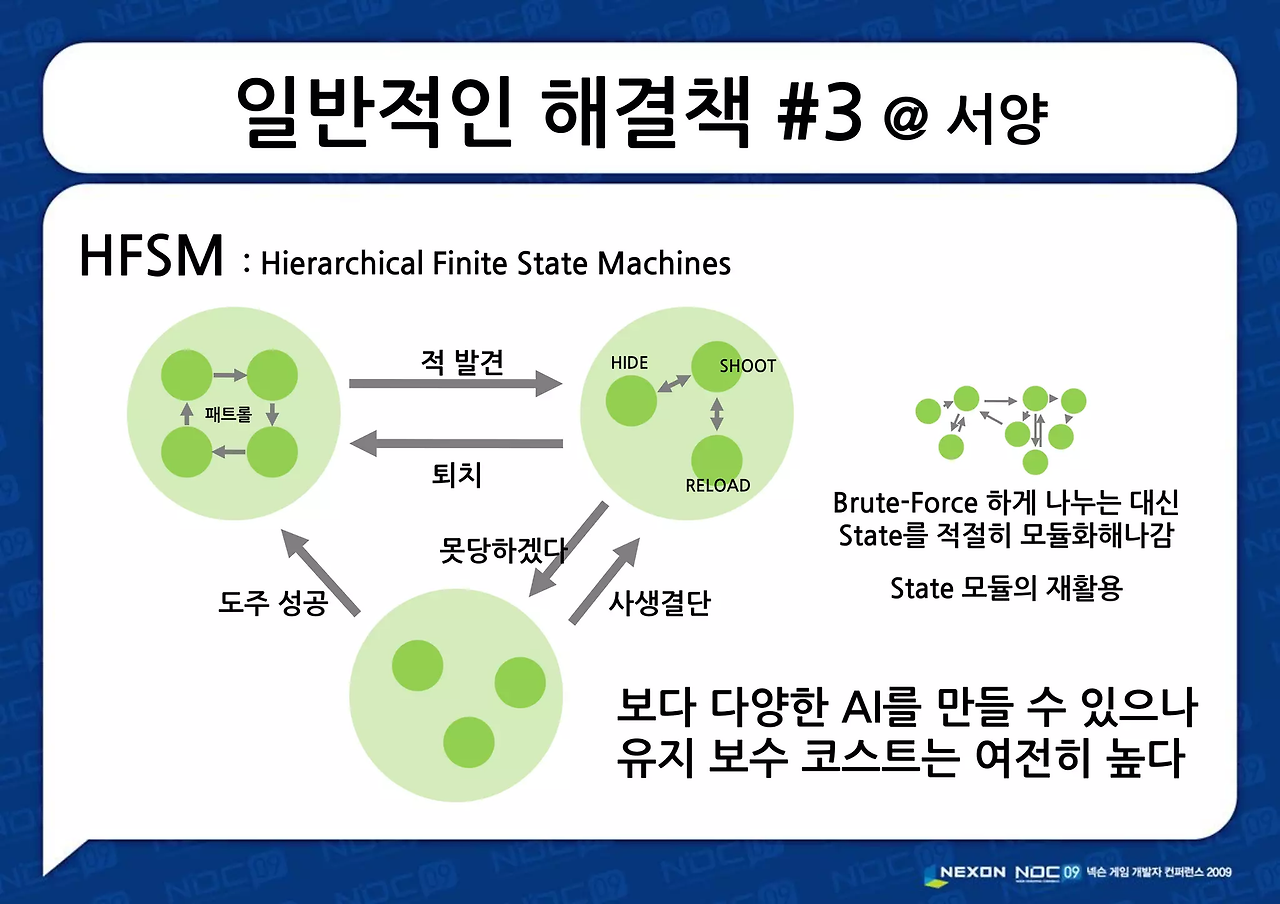
상태가 계층적으로 구성되는 FSM의 유형으로, 복잡한 상태가 있을 때 이를 범주화시켜서 관리하는 방법을 말한다. 예를 들어, Idle, Jump, Walk, Move의 4가지 상태가 있다면, 이를 Idle과 Move라는 두 가지 상태 범주로 나누고, Move안에 Jump, Walk, Move가 포함되게 할 수 있다. 이런식으로 계층적으로 설계할 경우 기존대비 조금 더 복잡한 상태 관리가 가능해진다.
public interface IState
{
    void Enter();
    void Execute();
    void Exit();
    void HandleInput();
}

public abstract class State : IState
{
    protected Character character;

    public State(Character character)
    {
        this.character = character;
    }

    public virtual void Enter() { }
    public virtual void Execute() { }
    public virtual void Exit() { }
    public virtual void HandleInput() { }
}

public class IdleState : State
{
    public IdleState(Character character) : base(character) { }

    public override void Enter()
    {
        Debug.Log("Entering Idle State");
    }

    public override void Execute()
    {
        Debug.Log("Executing Idle State");
    }

    public override void Exit()
    {
        Debug.Log("Exiting Idle State");
    }

    public override void HandleInput()
    {
        if (Input.GetKeyDown(KeyCode.M))
        {
            character.ChangeState(new MoveState(character));
        }
    }
}

public class MoveState : State
{
    private State currentState;

    public MoveState(Character character) : base(character)
    {
        currentState = new WalkState(character); // 초기 하위 상태
    }

    public override void Enter()
    {
        Debug.Log("Entering Move State");
        currentState.Enter();
    }

    public override void Execute()
    {
        Debug.Log("Executing Move State");
        currentState.Execute();
    }

    public override void Exit()
    {
        Debug.Log("Exiting Move State");
        currentState.Exit();
    }

    public override void HandleInput()
    {
        currentState.HandleInput(); // 하위 상태의 입력 처리

        if (Input.GetKeyDown(KeyCode.I))
        {
            character.ChangeState(new IdleState(character));
        }
    }

    public void ChangeSubState(State newState)
    {
        currentState.Exit();
        currentState = newState;
        currentState.Enter();
    }
}

public class WalkState : State
{
    public WalkState(Character character) : base(character) { }

    public override void Enter()
    {
        Debug.Log("Entering Walk State");
    }

    public override void Execute()
    {
        Debug.Log("Executing Walk State");
    }

    public override void Exit()
    {
        Debug.Log("Exiting Walk State");
    }

    public override void HandleInput()
    {
        if (Input.GetKeyDown(KeyCode.R))
        {
            character.ChangeSubState(new RunState(character));
        }
        else if (Input.GetKeyDown(KeyCode.J))
        {
            character.ChangeSubState(new JumpState(character));
        }
    }
}

public class RunState : State
{
    public RunState(Character character) : base(character) { }

    public override void Enter()
    {
        Debug.Log("Entering Run State");
    }

    public override void Execute()
    {
        Debug.Log("Executing Run State");
    }

    public override void Exit()
    {
        Debug.Log("Exiting Run State");
    }

    public override void HandleInput()
    {
        if (Input.GetKeyDown(KeyCode.W))
        {
            character.ChangeSubState(new WalkState(character));
        }
        else if (Input.GetKeyDown(KeyCode.J))
        {
            character.ChangeSubState(new JumpState(character));
        }
    }
}

public class JumpState : State
{
    public JumpState(Character character) : base(character) { }

    public override void Enter()
    {
        Debug.Log("Entering Jump State");
    }

    public override void Execute()
    {
        Debug.Log("Executing Jump State");
    }

    public override void Exit()
    {
        Debug.Log("Exiting Jump State");
    }

    public override void HandleInput()
    {
        if (Input.GetKeyDown(KeyCode.W))
        {
            character.ChangeSubState(new WalkState(character));
        }
        else if (Input.GetKeyDown(KeyCode.R))
        {
            character.ChangeSubState(new RunState(character));
        }
    }
}

public class StateMachine
{
    private State currentState;
    private Character character;

    public StateMachine(Character character)
    {
        this.character = character;
    }

    public void ChangeState(State newState)
    {
        currentState?.Exit();
        currentState = newState;
        currentState.Enter();
    }

    public void ChangeSubState(State newState)
    {
        if (currentState is MoveState moveState)
        {
            moveState.ChangeSubState(newState);
        }
    }

    public void Update()
    {
        currentState?.Execute();
    }

    public void HandleInput()
    {
        currentState?.HandleInput();
    }
}

public class Character : MonoBehaviour
{
    private StateMachine stateMachine;

    void Start()
    {
        stateMachine = new StateMachine(this);
        stateMachine.ChangeState(new IdleState(this));
    }

    void Update()
    {
        stateMachine.Update();
        HandleInput();
    }

    private void HandleInput()
    {
        stateMachine.HandleInput();
    }

    public void ChangeState(State newState)
    {
        stateMachine.ChangeState(newState);
    }

    public void ChangeSubState(State newState)
    {
        stateMachine.ChangeSubState(newState);
    }
}
푸시다운 오토마타(Pushdown Automaton)
다녀온 상태들을 모두 스택에 저장하는 방식이다.
이전 상태가 무엇인지를 아는 것이 매우 중요할 때 활용한다.
using System.Collections.Generic;

public interface IState
{
		// 기본적으로 상태들은 들어갈 때와 나올 때, 그리고 매 프레임이 중요함
		// Start, Update, OnDisable 생각하면 됨
    void Enter();
    void Execute();
    void Exit();
}

public class StateMachineWithStack
{
    private Stack<IState> stateStack = new Stack<IState>();

    public void PushState(IState newState)
    {
        stateStack.Push(newState);
        newState.Enter();
    }

    public void PopState()
    {
        if (stateStack.Count > 0)
        {
            stateStack.Pop().Exit();
        }
    }

    public void Update()
    {
        if (stateStack.Count > 0)
        {
            stateStack.Peek().Execute();
        }
    }
}

public class Character : MonoBehaviour
{
    private StateMachineWithStack stateMachine;

    void Start()
    {
        stateMachine = new StateMachineWithStack();
        stateMachine.PushState(new IdleState());
    }

    void Update()
    {
        if (Input.GetKeyDown(KeyCode.W))
        {
            stateMachine.PushState(new WalkState());
        }
        else if (Input.GetKeyDown(KeyCode.I))
        {
            stateMachine.PopState();
        }

        stateMachine.Update();
    }
}'스파르타 게임개발종합반(Unity) > TIL - 본캠프 매일 공부 기록' 카테고리의 다른 글
| 2024.06.07 TIL - 컴퓨터 & GPU 아키텍쳐 특강 (0) | 2024.06.07 |
|---|---|
| 2024.06.05 TIL - MenuItem, 유니티 메뉴창에 툴 구현하기 (3) | 2024.06.05 |
| 2024.06.03 TIL - InputSystem Pass Through, Value 차이 (0) | 2024.06.03 |
| 2024.05.31 TIL - Framework 특강 정리 (0) | 2024.05.31 |
| 2024.05.30 TIL - 객체지향 특강2 정리(SOLID 원칙) (0) | 2024.05.30 |

댓글