지난번 확장판 - 메뉴창에 툴 만들기
지난번에 자동으로 오브젝트의 박스 콜라이더 크기를 맞춰주는 `AutoCollider.cs`를 작성했었다.
지난번의 방식은 오브젝트에 스크립트 컴포넌트를 추가해주는 방식이었고, 이번에는 유니티 메뉴창에 툴을 만들어 추가해보도록 하겠다.
using UnityEngine;
using UnityEditor;


public class AutoCollider : MonoBehaviour
{
    [MenuItem("Tool/AutoCollider")]
    public static void AdjustBounds()
    {
        GameObject selectedGameObject = Selection.activeGameObject;
        if (selectedGameObject != null)
        {
            Renderer mr = selectedGameObject.GetComponentInChildren<MeshRenderer>();
            if (mr == null) mr = selectedGameObject.GetComponentInChildren<SkinnedMeshRenderer>();
            var box = selectedGameObject.GetComponentInChildren<BoxCollider>();
            if (box == null)
            {
                box = selectedGameObject.AddComponent<BoxCollider>();
            }
            box.center = mr.bounds.center - selectedGameObject.transform.position;
            box.size = mr.bounds.size;
        }
    }
}
전체 코드이다.
여기에서 주목할 점은 `MenuItem`속성이다.
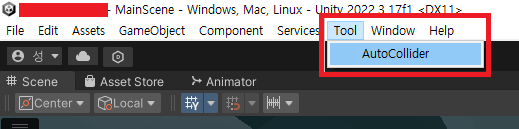
메뉴창에 `Tool`이라는 메뉴가 생겼다.
그리고 그 밑에 `AutoCollider`라는 하위 메뉴가 있다.
`MenuItem`속성은 위와 같이 유니티 에디터의 메뉴를 등록할 수 있다.
주의할 점

꼭 `Editor`이라는 폴더 안에 스크립트를 넣어야 메뉴에 뜨도록 유니티가 인식할 수 있다.
또한, 메서드명에는 `static`이 포함되어야 한다.
결과 영상
동영상 서비스가 종료되어 해당 콘텐츠를 재생할 수 없습니다.
            if (box == null)
            {
                box = selectedGameObject.AddComponent<BoxCollider>();
            }
참고로 박스 콜라이더 컴포넌트를 추가하지 않아도 자동으로 추가된다.
반응형
'스파르타 게임개발종합반(Unity) > TIL - 본캠프 매일 공부 기록' 카테고리의 다른 글
| 2024.06.10 TIL - Git 리포지토리에서 특정 폴더 Clone 하기(초보자도 쉽게 따라하기) (0) | 2024.06.11 |
|---|---|
| 2024.06.07 TIL - 컴퓨터 & GPU 아키텍쳐 특강 (0) | 2024.06.07 |
| 2024.06.04 TIL - 디자인 패턴(하) 특강 정리 (0) | 2024.06.04 |
| 2024.06.03 TIL - InputSystem Pass Through, Value 차이 (0) | 2024.06.03 |
| 2024.05.31 TIL - Framework 특강 정리 (0) | 2024.05.31 |

댓글